
Showing posts with label Christmas gift Ideas. Show all posts
Showing posts with label Christmas gift Ideas. Show all posts
Thursday, December 19, 2013
Christmas Card Folder
Hello. Today's project is something I've made and used over and over again because it's so great. It's a card holder for Christmas cards. I saw this idea a few years ago from a demonstration shown at Stampin' Up!'s convention and have made several versions of this since. This is a pretty easy project to make. It's made from one sheet of card stock with a few cuts and scores. I then placed 6 matching Christmas cards inside with envelopes to give as a gift. I don't have the measurements with me right now, but when I find them, I will be sure to post them so you can make one too. People love getting hand made cards to give to friends, especially if all the work is already done for them!
 The colors I used for this folder are Cherry Cobbler, Pear Pizzaz and Whisper White. The stamp set is now retired and I've forgotten the name, but you can use any stamp set that you have at home. I'm constantly using whatever's my favorite at the moment, so that changes rather frequently. I may just have to make one of these with a birthday stamp set coming out in the Occasions catalog on January 3. I'm getting an idea right now…. Check back for that next month! Thanks for stopping by today, and I'll see you tomorrow!
Tuesday, December 17, 2013
DIY Christmas Ornament
Hello! Here's another project a friend asked me to share on my blog. This is yet another project made with my friend Mayra. She always has beautiful projects for me to make, and I learn so many techniques from her. She always makes these elaborate cards and projects that typically I would look at and think "that's way too much work" or "that would be way too hard to make", and then I see it at her house, she shows me how to make it, and then I'm like "ok, that wasn't too bad after all!" Thanks Mayra for the endless great ideas!
This is an ornament that was displayed on Stampin' Up!'s holiday catalog last year and is made with the Holiday Ornaments Framelits (#127816 $24.95). These framelits coordinate with the Ornament Keepsakes stamp set (#128048 Wood $34.95, #128051 Clear $25.95) and are still available. I loved learning how to make this ornament. It was time consuming, but I enjoyed every minute of making it.


In the center of the ornament are some snowflakes cut with the Snowflake die in last year's holiday catalog, and then a greeting stamped and cut into a ribbon glued on top of the snowflakes. I added some Cherry Cobbler tulle in between each point of ornaments for some extra color, and added two rhinestones for some shimmer. I love this ornament! I hope you enjoyed the project today. Thanks for stopping by, and I'll see you tomorrow!
Monday, December 16, 2013
DIY Rosette Wreath
Hello! A friend asked me to share this project on my blog, so I will. This is a wreath I made at none other than my friend Mayra's house. We made this two years ago, and I still love it and still get lots of compliments on it. Even people who aren't crafters love this wreath and want to make one. It wasn't hard, it just took a lot of time. This was my first experience with rosettes, and while they are time consuming, I will say they are worth the time, because they are absolutely gorgeous and just amazing!
This wreath is made up of 9 rosettes. Some are patterned paper, some are card stock, all in matching colors. I glued a small 3/4'' paper circle on top of each rosette, and then glued a button on top of the circle on a few of them. Then I made a loop with ribbon to hang the wreath from, tied a bow with more ribbon, glued that to the front, stamped a christmas greeting and cut it out, and then glued that to the top front of the wreath, and I was all finished. I love this wreath. It's a beautiful decoration, and an even better gift! I hope to make a few of these before this Christmas and give them to some friends.


Thanks for stopping by today, and thank you Mayra for such a beautiful project! I'll see you all tomorrow!
Saturday, December 14, 2013
Snowman Hot Chocolate
Hello! Last year as my son was eating lots of baby food, I had an abundance of baby food jars, and knowing me, I had to save everyone of them! I just knew I could do something with them after I washed them out. A friend of mine told me she was saving and re-using her baby food jars as well and showed me this super cute snowman made with baby food jars. It's three layers of jars filled with hot cocoa mix, marshmallows, and chocolate chips, but you could substitute the chocolate chips with peppermint candies if you like peppermint hot chocolate. Either way, it turns out cute.


When they were all filled, I painted the lids with black and white acrylic paint in flat, painted a nose, eyes, mouth and buttons, added some riding hood red striped grosgrain ribbon from Stampin' Up! for the scarf, and I was done. I think they're really cute, they make great little gifts, and they will cheer anyone up! :) I hope you enjoyed today's post, and thanks for stopping by today! I'll see you tomorrow!
Friday, December 13, 2013
Joy Banner
Hello! This will be a quick post today. Still tons of stuff to do, but I'm sure you can relate- 'Tis the season…. :) I'm excited though. It's all good stuff for sure!
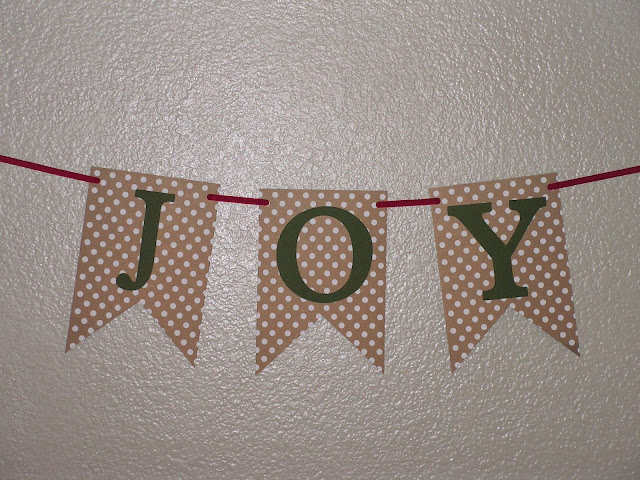
This is a banner I made for a friend last year who was in need of a little Christmas cheer. It's a simple banner, but I love it. Usually when I make something, I'm so proud of my work/so happy with the result that I don't want to give the item away. I did feel that way about this banner, but it was funny because when I showed it to my husband and told him where it was going, he was bummed I had to give it away. :) But it was easy enough that I can make another one. I cut one piece of 12 x 12 patterned card stock to make the flag/banner pieces, trimmed a triangle out of the center of each, cut Joy out with my Sizzix Alphabet dies by Stampin' Up!, glued them to the banner, strung the banner with some Real Red grosgrain ribbon, and I was done. I love how quick it came together, because my friend had told me that morning at church that she just wasn't feeling the Christmas spirit, so after church I raced home, made a few things for her and then ran over that afternoon to deliver them. I had told her I'd deliver them to her the next day, but I got so excited making them, I couldn't wait until Monday and delivered them that same day.
This is a banner I made for a friend last year who was in need of a little Christmas cheer. It's a simple banner, but I love it. Usually when I make something, I'm so proud of my work/so happy with the result that I don't want to give the item away. I did feel that way about this banner, but it was funny because when I showed it to my husband and told him where it was going, he was bummed I had to give it away. :) But it was easy enough that I can make another one. I cut one piece of 12 x 12 patterned card stock to make the flag/banner pieces, trimmed a triangle out of the center of each, cut Joy out with my Sizzix Alphabet dies by Stampin' Up!, glued them to the banner, strung the banner with some Real Red grosgrain ribbon, and I was done. I love how quick it came together, because my friend had told me that morning at church that she just wasn't feeling the Christmas spirit, so after church I raced home, made a few things for her and then ran over that afternoon to deliver them. I had told her I'd deliver them to her the next day, but I got so excited making them, I couldn't wait until Monday and delivered them that same day.

Thanks for stopping by today. I'll see you tomorrow!
Sunday, December 8, 2013
Makin' a list, checking it twice...
Hello! Today I want to share a gift made for me by my friend Mayra. She always comes up with cute and clever little gifts, and I love being the recipient of them. She made a little list pad for making notes to Santa, a list of people to send Christmas cards to, things to do before Christmas, shopping list, gift list, or whatever. I think it's really fun for this season. I love the real looking Santa on the front, and the matching greeting that says "He's making a list and checking it twice.... It gets me just as excited for Christmas as when I was a little kid.
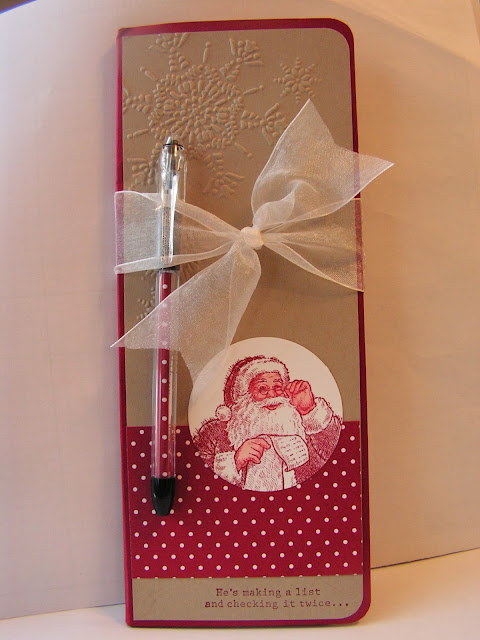
 She found the note pads at a local office supply store, had her husband cut the pads in half, and then covered it with Cherry Cobbler Designer Series Paper and then put it in a card stock cover. As you can see in the first picture, she even made a matching pen by rolling up some of the Cherry Cobbler Designer Series Paper inside the well of the pen. Just a fun way to turn something ordinary into something special and fun for the holidays! Thanks to Mayra for the fun gift and for the idea! I hope she's inspired you to craft up something fun for some of the people on your list this year! Thanks for stopping by and I'll see you tomorrow!


Saturday, December 7, 2013
Christmas Gift Box
Hello! Today I wanted to share a Christmas gift box that I made at a meeting with some other fellow demonstrators. The supplies and design were provided by Patty Bennett. Thanks Patty for the supplies and the cute idea! The box is from the Tag A Bag Gift Boxes (Item #130927 $6.95 for 8) sold by Stampin' Up!, and is dressed up with some Season of Style Washi Tape (#132155 $4.95), Cherry Cobbler 1'' Stitched Edge Grosgrain Ribbon (#132135 $8.95), and a tag cut from the Chalk Talk Framelits (#129380 $24.95), and lined with some of the Season of Style Designer Series Paper (#132340 $10.95).


This is a quick and simple way to wrap a small gift, and if you don't want to spend a whole lot of money on gifts this year, buy these boxes, dress them up, and put a small something in it for friends, teachers, co-workers, neighbors and family, and they'll be impressed with the beautiful packaging! Hope you're staying warm out there. Thanks for stopping by and I'll see you tomorrow!
Friday, December 6, 2013
DIY Christmas Post-It Note Holder
Hello and Happy St. Nicholas Day! I hope you left your shoes out last night and woke up with them filled with an orange and some nuts or little treats. I know we did here! :) I love the Christmas Season!
Today I want to share a project designed by my friend Carrie Nelson. I don't know anyone who doesn't use Post-Its, so this project makes a great gift for just about anyone! The holder is just barely bigger than the Post-Its, so it measures 7'' x 3 1/2''. Carrie cut a slit in the top part to hold a little mini pencil, and then I decorated the top with paper from the Season of Style Designer Series Paper Stack, Cherry Cobbler Seam Biding Ribbon, and a stocking from the Color Me Christmas Stamp set. Thanks for the cute idea Carrie!


 That's how easy this project was! I hope this gives you some ideas for little gifts this Christmas Season. All of these items can be purchased through my online store here. Thank you for stopping by and I'll see you tomorrow!
Today I want to share a project designed by my friend Carrie Nelson. I don't know anyone who doesn't use Post-Its, so this project makes a great gift for just about anyone! The holder is just barely bigger than the Post-Its, so it measures 7'' x 3 1/2''. Carrie cut a slit in the top part to hold a little mini pencil, and then I decorated the top with paper from the Season of Style Designer Series Paper Stack, Cherry Cobbler Seam Biding Ribbon, and a stocking from the Color Me Christmas Stamp set. Thanks for the cute idea Carrie!


Wednesday, December 4, 2013
Stampin' Up!'s Weekly Deals and a Christmas Card
Hello! I wanted to let you know about the deals for this week by Stampin' Up! I think they're great!


Monday, December 2, 2013
Cyber Monday Sale, Best of 25 December Set and a DIY Handmade Ornament
Hello! I have so much to share with you today! First off, be sure to head to my online store today for great Cyber Monday deals! They're 30% off for one day only, and you won't want to miss out! These products will make great gifts for the holiday crafters on your list, or to help you complete all your holiday cards and projects! Click here to go to my online store. Here are the deals from the Stampin' Up! website:


HOLIDAY SALE
These products are 30 percent off for 24 hours on Monday, December 2:
| Description | Retail Price | Sale Price |
Envelope Liners Framelits Dies (item 132172)
|
$26.95
|
$18.87
|
Expressions Thinlits Dies (item 132171)
| $24.95 | $17.47 |
Holly Jolly Greetings Simply Sent (item 132159)
|
$14.95
|
$10.47
|
Snowflake Season Simply Sent (item 132176)
| $14.95 | $10.47 |
Large Rhinestone Basic Jewels (item 129324)
|
$4.95
|
$3.47
|
Extra-Large Gift Box (item 132147)
|
$3.95
| $2.77 |
Also, the December Best of 25 stamp set has been released. It's the last one of the series, so if you're trying to complete a punch card to get your free set, this is the last one they are making, but the stamp sets will still be available through March 31, 2014. This month's stamp set is Best of Sale-A-Bration. Sale-A-Bration starts January 28th, 2014, and if you've never heard of it, let me tell you how it works: for ever $50 you purchase of Stampin' Up! product, you can choose any single item from Stampin' Up!'s Sale-A-Bration catalog for free. You can stack the free items if you spend more than $50. For example, if you spent $150, you choose 3 free items from their catalog. It's a great deal, and stamp sets that are offered in the Sale-A-Bration catalog are only available during Sale-A-Bration months and cannot be purchased, you have to earn them with a $50 purchase. With that being said, Stampin' Up! has put together a Best of set featuring poplar Sale-A-Bration stamps from the past that you can purchase in a set. Click here to view this month's stamp set.
And last but not least, here's my project to share for the day:

This is an ornament I've made with the Holiday Ornaments Framelits (#127816 $24.95). These framelits coordinate with the Ornament Keepsakes stamp set (#128048 Wood $34.95, #128051 Clear $25.95) and are still available. You can order them in my online store here. I chose to cut the ornament out in a sheet of Gumball Green Designer Series Paper, but whether you use patterned paper or stamp the image, it looks great. I really love this set and think it's something that you can use year after year on your holiday cards, scrapbooks, projects and art with kids, because you aren't limited to colors and designs with these framelits and coordinating stamps. You can use them year after year and change up patterns and colors to match whatever is trending at the time. I love these! They're also great because there are 9 stamps and 8 framelits, giving you lots of choices for your creations, and these make great gifts when you make them. People are wowed by them and they're not hard to make. An inexpensive gift idea! They can also be used to decorate packages and handmade jar gifts too. They're great for just about anything! A great deal and worth every penny! Later on in the month, I'll show you a larger, more detailed/ornate ornament I made last year with the set. It's absolutely beautiful. I also have a smaller ornament I made last year and will show that too, once I take a picture of it.
Thanks for stopping by today. I'll see you tomorrow!
Sunday, December 1, 2013
Warmest Wishes Cocoa/Coffe Cup
Hello! Today's post is quick and easy. I covered a styrafoam cup that you use for hot cocoa or coffee with the Season of Style Designer Series paper, stamped a greeting on a sheet of Whisper White card stock, then punched out a circle and mounted that on another circle, punched out a scallop circle punch, and mounted all three on a belly band of Crumb Cake on the cup. I popped up the scallop circle with dimensionals and added a little star cut out of the silver glimmer paper for a little extra something. ( I love that glimmer paper! It's on sale right now through December 2. I suggest you stock up! I did!) I hope you like this project. It's easy to recreate. And you can fill the cup with hot cocoa, spiced cider, or whatever warm drink you prefer when it's cold!
 Here's a little tip about how to cut the paper to cover the cup: you can't cut a straight strip of paper, because the cup is round, it wouldn't wrap around the cup right. I pulled off the little label around the cup and used that as a template for my Designer Series Paper. Then I used that template to make a smaller template for the card stock belly band. Hope that helps! See you tomorrow!

Saturday, November 30, 2013
Christmas S'mores DIY Treat Kit
Hello! I hope you're enjoying your Thanksgiving weekend! Today I wanted to share an idea for a little treat you can make up for friends, neighbors, teachers, co-workers, etc. I got this idea from my friend Mayra, who made something like this for halloween. I put a mounds bar in because I was out of plain Hershey's chocolate bars, but I would recommend putting in a plain Hershey's bar instead.
 I used stamps from an old Stampin' Up! set from a while back, because I just love these little ones, but you could use whatever stamps you have on hand. I die cut the bag topper from the Season of Style Designer Series Paper by Stampin' Up! with my Deco Labels Framelits. The punches I used were the Curly Label Punch, a 1 1/4'' circle, and a 1 3/8'' circle punch.
I hope you enjoyed today's post, and that it gives you a simple idea for Christmas treats. Thank you for stopping by today, and I'll be back tomorrow with another great idea for Christmas. See you tomorrow!

I hope you enjoyed today's post, and that it gives you a simple idea for Christmas treats. Thank you for stopping by today, and I'll be back tomorrow with another great idea for Christmas. See you tomorrow!
Tuesday, November 26, 2013
Very Merry Chapstick Holder
Hello! Today I want to share a project I made for my class last week at my home. I love chapstick and use it a million times a day, so I thought up an easy little holder to put a chapstick in that would make a great little gift for a neighbor, co worker, teacher, or friend. I used the circles framelits to cut the circle and scallop circle cut out of Old Olive card stock and Season of Style Designer Series Paper. I layered the two pieces of paper on top of each other with sticky strip, added some chapstick held down with sticky strip, then punched a hole with a single hole punch, tied it closed with some Cherry Cobbler Seam Binding Ribbon, and then stamped a greeting on Whisper White card stock in Crumb Cake ink, punched it out with a 1 1/4'' circle punch, punched another circle out in Cherry Cobbler with a 1 3/8'' circle punch, and mounted the two on a scallop circle punch in Baked Brown Sugar. I added a little rhinestone jewel for an extra something, and that was it! It truly was easy! This makes a great little gift for someone. Chapstick can be pretty inexpensive when you buy it in a 3 or 4 pack like I did, so these are great gifts for any small-large group you may need a little treat for.

 Thanks for stopping by today. Don't forget to check back tomorrow, and use hostess code UEEJ6PPB when you place an online order through my store. You can view all the items on sale through December 2 in my store as well. See you tomorrow!


Subscribe to:
Posts (Atom)