Showing posts with label Halloween. Show all posts

Thursday, October 31, 2013

Happy Halloween!

Hello!  Thanks for stopping by today.  I hope you all have a happy Halloween today!  I have a fun little project to share with you today.  I made up some little Hershey Kiss tents for some Moms for a little music group I take my son to, and for the office staff for my dentist appointment today.  I had so much fun making these and couldn't wait to pass them out!  I was so happy with how they turned out, even though I simplified it because of time constraints.  I felt like these were easy, considering I'd made one once before, but I couldn't find my template, so I just whipped one up before making them.

I covered the tents with strips cut from the Witches' Brew designer series paper, and then stamped images from the Spooky Bingo Bits stamp set, punched them out with a 1" circle punch, and stuck them on with stampin' dimensionals.

 I put two strips of sticky strip, one to close the tent when I was done, and one to keep the Hershey Kisses in place.
The tent size is 3'' x 4 3/4''.  Once you've cut the tent, score it at 3/4, 2 1/8, and 3 3/8.  Then add your sticky strip to the top flap and the middle flap, add the hershey kisses, and cover the front!  Enjoy!  I hope you have a safe Halloween!

Wednesday, October 30, 2013

More Halloween Cards!

Hello!  I made some more Halloween cards late last night and wanted to share them with you before they go off to the mail.


I used Stampin' Up!'s Witches' Brew Designer Series Paper, chevron ribbon in pumpkin pie (I cut it in half to make a little more narrow to fit my cards better), the modern label punch, a 1" circle punch, dimensionals, and two retired stamp sets: Spooky Bingo Bits, and Eat, Drink and Be Scary.  I really love how these cards turned out.  They took a little more time than my 5 minute cards from the other day, but I'm pleased with the results.  I hope you like the cards and that you'll check back tomorrow!  I have one last halloween post for you, and I'm excited.  I've been busy making lots of little Halloween goodies to pass out, and I'll have the templates with measurements posted too, so don't miss tomorrow's post!  See you then!

Monday, October 28, 2013

More Halloween Cards

Hi!  I'm back with a slightly different version of the card I posted yesterday.  I'm short on time these days, so my cards have become much simpler.  I'm sure the recipients don't mind so much-it's better than a store bought card, right?  This card is easy enough for stampers who are short on time!  I started with a crumb cake card base, added some torn strips of the witches' brew washi tape, stamped my little 'boo' stamp, punched it out with a circle punch, added a pop dot to the back, added some pumpkin pie grosgrain ribbon, and I was done.  Easy!  I think it's cute for how quick it came together.


Thanks for stopping by.  I'll see you tomorrow!

Sunday, October 27, 2013

Halloween card with Witches' Brew Washi Tape

Good morning!  Today I wanted to share a little card with you that I made for some of my friends.  I love this card because it can be made in five minutes or less, but I still think it's cute.  It's a great, simple card to make for someone who doesn't have a lot of time, which pretty much describes all of us, right?  I saw a card like this with a Christmas theme, which I intend to make and post that another time, but I got to thinking how easy it would be to make that same card but for Halloween.  I received the washi tape for free at convention this past summer (You've heard me mention convention in just about every post, but it's because it's so fun and I love it!  If you're interested in attending next year's convention, ask me how!) and was excited to finally use it!  I used it on a gift I made for some friends, that I posted yesterday, and today's card matches as well.  I cut a crumb cake card base, tore off three strips of washi tape, placed them off to the side and near the bottom of the card, stamped an image from the "Eat, Drink, and Be Scary" stamp set (retired) and tied some pumpkin pie grosgrain ribbon to the side of the card, and that was it!  Easy enough for you beginner stampers, but this could also be stepped up a little for you more advanced stampers out there.  I stamped the image in various colors by using the Stampin' Write markers from Stampin' Up! to color the stamp.  This is a much easier way to get different colors than trying to ink the stamp with several different colors and wiping off/covering up certain parts, etc.


Anyway, I hope you liked the card, and stop by tomorrow to see a slightly different play on this card.  I'll see you tomorrow.  Thanks for stopping by!

Saturday, October 26, 2013

Halloween treats with washi tape

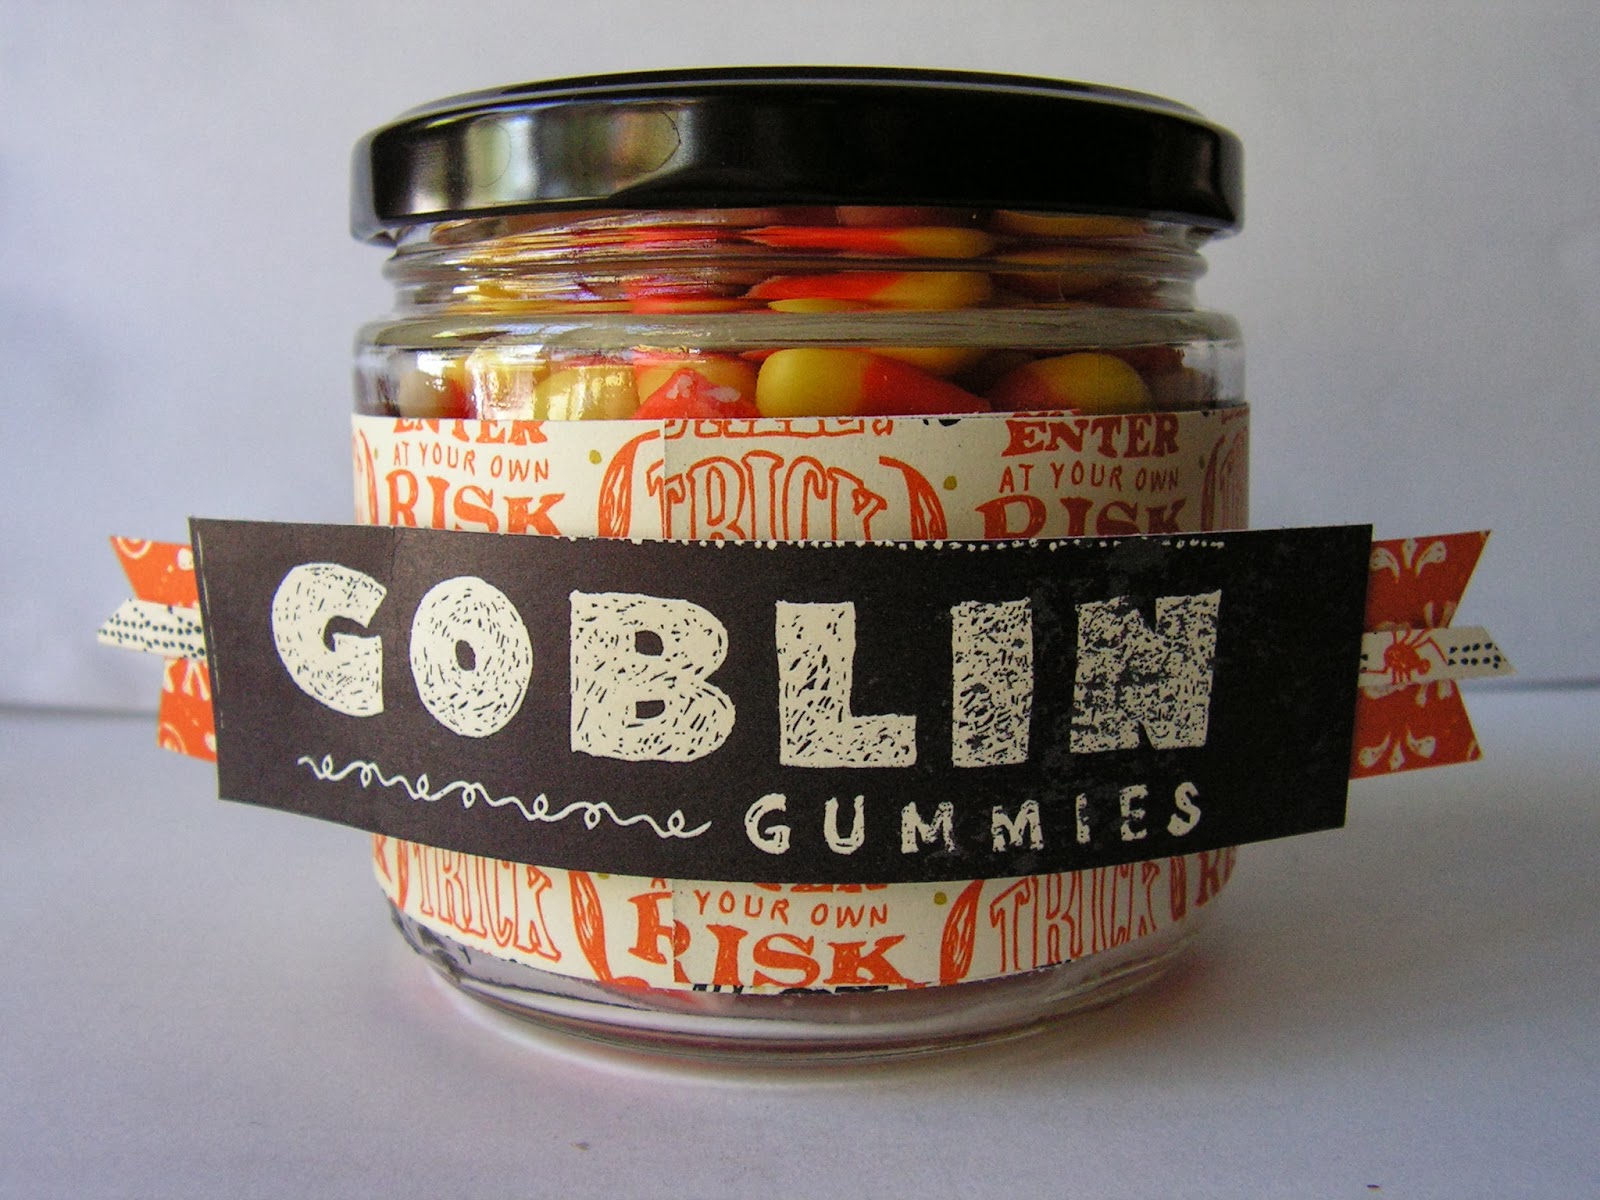
Hello!  Today's post is a halloween treat I made for some friends of mine that came to a class at my house.  I was soooo excited for them to come so that I could show them what I made!  I had so much fun making the treats I couldn't wait to blog about it.  I save all my glass jars from cooking and other things, and I always love finding new uses for them.   I filled these jars with homemade salsa, spray painted the tops of the lids with black 'flat' spray paint, and then wrote on the lids with Stampin' Up!'s stampin' chalk marker, and it was perfect!  The chalkboard look is very trendy right now, so I thought it would be fun to use the marker on the lids, and with the flat spray paint, it held really well.  I covered the jars with strips of paper cut from the Witches' Brew designer series paper pack, tied some ribbon over the paper to hold it in place and the jar was done!


Then I put some halloween shaped tortilla chips in a brown paper bag, stamped a little tag with the Eat, Drink, and Be Scary stamp set from a few years back, added some ribbon and dimensionals to the back and sealed the bag off with the Witches' Brew washi tape, and it was done.  I thought it was a fun little treat!  I've been thinking of this little gift all month, ever since I found the tortilla chips at the store!


This is a fun and easy treat to make for friends and neighbors, and the great thing is, it makes a lot.  I hope you enjoyed today's post and that you'll check back tomorrow for more halloween projects!
Thanks so much.  Happy crafting!

Sunday, October 13, 2013

Halloween Treat Pails

Hello! Today's post is a little treat I made for two of my friends.  I tutor a little girl in 5th grade, and for the first day of October, I wanted to give her and her mom a little something because I'm excited it's October!  I bought these cute little pails at Target a year or two ago in the dollar section and have wanted to use them for something for a while.  I filled them with little tissues I found in the dollar section last week at Target, some little fun size snickers bars covered in Stampin' Up!'s Witches' Brew designer series paper (#132185 $10.95), and some candy corn stashed in cello bag from the Pumpkin Pie Goodie Gear Simply Created Kit (#132792 $4.95) tied off with a tag stamped from the Tags 4 You stamp set (Wood 131820 $19.95  Clear 131823 $15.95) and punched out with the matching Label Bracket Punch (#132153 $15.95).


I couldn't wait for tutoring that day because I was so excited to give them their little treats!  Hope you're having fun getting excited for Halloween!

Saturday, October 12, 2013

Witches' Brew Halloween treat jar

Hello!  Today's project was a little something I whipped up last night.  I am really excited for Halloween, and I wanted a cute way to display candy corn that I bought, but I needed a way to keep it safe from my sneaky little toddler.  In the past, I've just put candy on little candy plates or in bowls on my end tables, but now that I have a little boy walking and climbing around, the candy can't just sit out on a plate for his long arms to reach!  I love to reuse things like jars and containers, and a friend saved me some of her jars, so I just covered this old guacamole jar with some Stampin' Up! Witches' Brew designer series paper (#132185 $10.95), and it became a cute display for my now safe candy corn.  All I used was some small strips from the paper pack, some sticky strip (#104294 $6.95), stampin' dimensionals (#104430 $3.95), and that was it! An inexpensive and quick little treat!


Enjoy!  What little Halloween treats and gifts are you making?  See you tomorrow!

Friday, October 4, 2013

Toil and Trouble Halloween Card

Good morning!  I'm in the mood for Halloween, so here's another halloween card.  This is another card I received while at Stampin' Up!'s convention this summer.  This card is really fun.  I like it for many reasons.  First, the bat.  The person who made this card was brilliant in making that bat!  She punched out a butterfly from black card stock, and then took a scallop circle punch and punched the edges of the wings off to transform it from a butterfly to a black bat.  How genius is that?!  I also like the 'sunburst' technique that she did with strips of paper cut diagonally-ish.  She used paper from the witches' brew designer series paper pack, paper from the modern medley paper pack, and paper from the brights designer series paper stack to make the strips.  Then she stamped the Bat/tounge/trouble stamp (which is from the Toil and Trouble stamp set), punched out the stamped image with the extra large scallop circle, matted it on a pumpkin pie circle, and that's it. 


 How neat!  I think it's easy, but I know some of you are still thinking that's way too much work.  Either way, I hope you enjoyed today's card and that you'll check back tomorrow!   See you then!